Man, I love thrift store shopping! I needed some new to me picture frames for a project I had in the back of my mind, and both Hobby Lobby and Michael's were running 40% to 50% off of their frames. Holy cow, even though they were that much off they were still around $15. I was not about to spend that much, because I knew I was going to have to paint them and I wasn't going to use the glass.
So, off to the thrift shop I went. Well, I found my frames, and something else. Doesn't that always happen? I found a coffee table in very good condition and had very few scratches. The top was laminate and the legs were wood. I did not purchase it that day. I have a 24 hour rule, if I can't stop thinking about an item for 24 hours I'll go back and get it. If it's not there, then it wasn't meant to be.
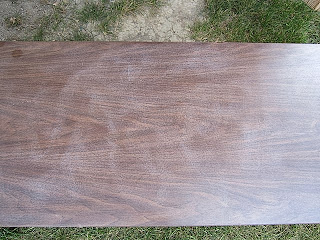
Before shot
Well, I fell asleep thinking about all the different paint color combinations that would look good on it. I envisioned an industrial look with brackets and flat dark paint. The next day I had to go back and get it. I was lucky, it was still there and only $15! It was totally meant to be mine.
There was truly nothing wrong with it, just a few scratches. I knew I was going to paint it, so the scratches didn't matter, a little filler and paint and you'd never know they were there.
My cat thought it was for her.
Here's another before shot
I was talking with my neighbor and she helped me come to the decision of making it for him. His teams are the Detroit Tigers and the Detroit Lions. It was between the two, orange/ navy or silver/ blue. Well, I was in a orange kind of mood so the Tigers won. Enough of my rambling, here is what you'll need.
Supplies:
TSP
Two buckets for TSP
Gloves
Sponges
Cloth diaper
Oil based spray primer
Flat Paint in your teams colors (I'll explain this farther down)
Sanding block
Palm sander
Tacky Cloth
Stencils for your team
Foam roller
Brushes
Dust Mask
Wood Filler
These first few steps are the same as this and this post. If you have already read those posts skip down to step 4.
Cleaning your furniture is a must. I know some people do not use TSP, they just wipe it down. The reason I use it is because it cleans really well and it removes some of the top layer of whatever is on it. That means less sanding.
1. This is where you'll need your two buckets, sponges and gloves. All I'm going to say is, wear the gloves! If you don't it will burn your fingers and ruin your manicure. Okay, fill one bucket with warm water and one with the TSP solution. Using your sponges, and working in small areas wipe on the TSP and follow with a wipe down of water.
I should mention I do this step outside. You can do it inside, just make sure you protect everything around your piece- you don't want to ruin anything.
2. After you get your whole piece wiped down and dry it's time to use the wood filler (if needed) and sand. I've read that some people do not sand laminate if they are using oil based primer. I still sand lightly- just enough to remove the shine for better adhesion of paint.

Alright, if you have dings or nicks you want to fill, now is the time to do it. After the wood filler is dry it's time to put your dust mask on and sand. I used a sanding sponge on the sides and legs and my electric palm sander on the top. The legs on my coffee table are wood and I just needed to sand lightly. I did not need to remove the stain.
3. After you sand, you need to remove the dust. I wipe it down with my cloth diaper and water, but you can use anything that is lint free. I also go one step further, when dry use my tacky cloth and wipe it down again. I know it's overkill, but I don't want to spent all the time prepping and painting for dust to be my undoing.
* please keep your dust mask on for this too!
4. Priming. If you've read my other posts, you know this is my favorite part. I really like oil based primer, but I don't like how I have to clean my brushes after. For this step I decided to use a spray primer, so you have to do it outside. There is no reason you can't use a water based primer and roll it on. If you are rolling it, you can do it inside.
Please read my tips on spray painting here.
For this coffee table, I only needed two coats of primer. I did sand (using the sanding sponge) the last coat a little, just to make it smooth. I then used the tacky cloth again to wipe it down before painting.
5. Painting. I did a quick search on the Tiger's colors and found Gliddon offers MLB, NFL, NHL, NASCAR and others at Home Depot. Well, I printed out what I needed and went to Lowe's and had them look up the colors and I used Valspar Paint + Primer. The names of the paints are Detroit Tigers Orange and Detroit Tigers Midnight Navy, which I got both in matte. I then got another orange in semi-gloss.

I had never worked with matte paint on furniture before and let me tell you I love it. I love the way it looks and the adhesion was amazing! I painted the top matte orange and the bottom half navy. Seriously, I love both of these two finishes so much I'm searching for something else to paint!
I did three light coats of paint. I painted two one day and then let dry overnight and did the third in the morning. You could totally be done with your piece with this step or you could take it to the next level and do what I did.
This is where I decided I absolutely need a Cricut. It would have been so much easier using one, but what I did was so much cheaper. It was free. Now, I need to plan some projects to see if the price of a Cricut is justifiable. Okay, back to the steps.
6. I Googled around looking for a stencil for the English D and of course I couldn't find one, but I did find a pumpkin stencil So I decided to make my own. For the D I printed it out on paper and cut it out. Then I laid it out on top of cardboard and using a craft knife cut it out. Since I was only going to use the words (Detroit Tigers) once I just cut it out on paper.
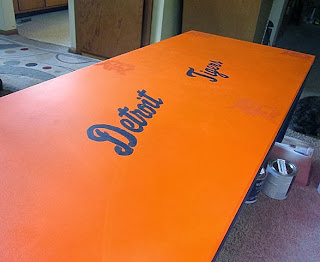
7. This is where I had to adjust my technique. For the first D I outlined it in the semi- gloss orange and then filled it in. I was going for a subtle, I didn't want it to pop out and scream at you- hello, here I am. I totally nailed it, it looked gorgeous. Then I realized this coffee table was going in the basement where the lighting is bad, and the D wouldn't have been visible.
 So, I made a last minute trip to Michael's where I knew they were running a sale on their craft paint. I ended up choosing Martha Stewart Crafts paints in Geranium with a high gloss finish. That did the trick! I outlined the D's and filled it in with the Geranium first. Then I topped it with two coats of the semi- gloss orange.
This gave me the effect I was looking for. I was planning on covering the whole coffee table in the D's, but stopped myself at six of them.
8. Before painting Detroit Tigers on the table, I busted out my tape measure and made sure the words would be centered. Because even though I don't watch TV much down there, if the words were off center it would drive me crazy until the end of time!
For some reason painting the words on took longer than the D's. Maybe it was the paper I was outlining and not cardboard? With this, I only need to paint two coats of the navy.
After the last coat was dry I lightly sanded and stood back and smiled. I love everything about this how this coffee table turned out! I loved surprising my partner with it. He works out of town during the week and when he got home on Friday the coffee table was in the living room to greet him. I'm not sure who was more excited me or him.
Have you tried painting furniture? How'd it turn out? Do you have any projects like this you are wanting to try? Please post below.
Oh and seriously, if you have a Cricut, do you use it a lot on projects? Is it worth the price? I'm really trying to justify getting one. I know there is another machine like it, I just can't remember what it's called.
If you know what it's called, please post it below.


i have found your work appealing of how to paint different pieces. i have got some rough tables home. after learning your techniques i am going to paint them likewise. good luck!
ReplyDeleteThank you so much, and good luck on your painting projects! Let me know how they turn out.
ReplyDeleteHello, I'm so happy with your blog site, it contains all the matter with regards to Laminates catalogue Good luck to you and your well performed job. Thanks for keeping us updated with the latest information for Laminates catalogue.
ReplyDeleteRegards
Laminates catalogue|
Laminate sheet
I came across the table picture while searching for images of the old english D. It looks great! I did one of my own and now has become a pretty serious hobby! I would post pictures, but can't seem to place them here.
ReplyDeleteVery nice job! Do you find one particular brand of paint better than the rest when repainting laminate furniture? I am planning on repainting my coffee and end tables which have serious dings on them. Was thinking of using Glidden Gripper for the primer since I used it before to paint fake 1970s wood paneling, but wasn't sure about how it would be on furniture.
ReplyDeleteI do need a good recommendation for the actual paint. Did the Lowe's Valspar brand hold up?
I like your blog a lot. Its informative and full of information. Thank you for sharing.
ReplyDeleteSpray Gun