Thursday, October 24, 2013

How to Pick the Right Paint Color (For You)


I know this is coming late, but I wasn't feeling the best this week. Still feeling groggy and tired, but I wanted to get this post done just in case any of you are thinking about painting this weekend.

My pizza pudgy pie!

But first, what an amazing weekend the Rhodes- Myers had. Friday night we got together with some friends and their kids and had a pudgy pie buffet.

Our friends who graciously hosted the pudgy pie party.


I'm talking pizza and grilled cheese pudgy pies.  All I can say is yum! After we ate the pudgy pies, six of us took off for the Haunted Cave here in Fort Fun and the other four went to hang out somewhere a little less scary at Crazy Pins.

This guy burned his hair right after this photo was taken. Don't worry, he was fine.


None of our group had never been to the Haunted Cave before it was definitely worth it. There was a room where we got shocked, a spinning room and of course plenty of people following us and getting in our faces. I'd totally go again. After we got out of the cave there were a group of people entertaining the crowd with things set on fire, like hula hoops and balls on strings. 

Oh and spitting fire. Which is dangerous, do not try this!
I'm obsessed with taking these types of photos. 


After, we all met back at our friend's house we continued with the pudgy pie buffet, but this time it was dessert. Blueberry, cherry, apples and apple- cheddar all with cinnamon and cinnamon brown sugar bread. Definitely a good way to end the night.   


Sunday was even more fun and busy. We had Christmas with my grandparents, cousins, aunts and uncles. Yes, you read that right, we had Christmas in October! My grandparents live in Florida half the year so we've been doing Christmas in October for awhile. Heck the first time we did it, it was actually Halloween. Christmas on Halloween was strange, or would it be Christoween or Hallomas? Well, whatever it's called, we had fun. Santa even showed up and asked the kids what they wanted for Christmas. 


I love this photo! Santa just left and the kids were looking to see how he was getting out of there!
My sweet daughter, whenever we go there she has to ride this bike.

Alright, enough about my amazing weekend.  Let's talk about paint, or more specifically how to pick the right paint color for you. I love color and love to paint but it can be hard sometimes finding the color your envisioning. All sorts of things come into play when your working with color on the walls, like light and shadows, time of day, tone of color and your surroundings. Oh, and if your going to use primer or not.

I'm not going to get into too much color theory, just what applies.Take for example you think you want a certain color and you go to the store and get the sample card. You think it's exactly what you want until you put it on the walls and realize it's not even close. That's because there are different tones of color. Basically cool and warm tones. Check out this door I messed up. I had used this color on my bead cabinet in another room and it looked great. Well, in this room it looked like a bright neon mess that was wholly unacceptable for the room (and my eyes). This is what happens when you mix a warm yellow and a cool yellow. Now, when you're designing a room you want to bring in cool and warm tones together, just not on the walls (and door). For me part of the driving factor of picking out the color of the room I just painted was I wanted it to be a warm neutral because everything in the room is a cool color. I wanted to balance it out.

This is just ridiculous! The door is white right now, until I can figure out what color to paint it. 


This is a good time to talk about living with a room first before you paint. For this room I had everything done before I even thought about my paint colors for the walls. I had picked out the fabric for the curtains first. When the fabric came in I picked the paint for the two dressers and the one cabinet, then came the trim. Not until all this was done did I even start to think about the paint for the walls.

Yep, the walls were mint green.

Another thing to think about is what will be surrounding the paint, like trim, is it light or dark? When my trim in the room was dark, the paint colors appeared really light. When I painted the trim white all the colors that I thought were really light appeared dark. Our eyes read different colors with the surroundings. This is why I tested seven different colors!


To prime or not. In my craft room, I thought I wouldn't have to prime because the mint shade was so light. Nope, I tried painting it without and the paint I was using looked pink. It was a lovely pink shade to use in a baby's room, but not what I was going for. I also screwed up another paint job when I didn't use a tinted primer here.

This is the color I ended up going with.

Wow, I almost forgot to talk about paint finish! The shinier the finish the easier it is to clean. Most professional painters will recommend high gloss in rooms with high traffic all the way down to a matte finish where you won't have people touching it. My daughter is 11 and doesn't have the sticky hands of a child and is way past the stage of coloring on the walls so I went with a matte finish. I wanted zero sheen because the furniture I painted was all in high gloss finish. I didn't want us to walk into the room and be blinded by the shine! 

All of these finishes are satin. This was taken with the flash on.

You can make it really easy, here's what it comes down to, buy sample paints. They are not very expensive and are well worth your time. I've seen on some blogs where people recommend buying poster board, painting it and then hanging it on your walls. That way you can see how the paint reacts to different times of day. I really like this idea, but I've never tried it. I just prime the walls then use my sample paint on top of it.

Flash from the camera off. 

The color that I finally chose was color matched at Lowe's. I was going for a Greige, that would change colors nicely throughout the day. By the way they can color match other company's paint colors, they actually have the colors in their database. So far I've color matched Glidden and Sherwin Williams. I haven't tried to see if they could match any off the Farrow and Ball's colors, but that's on my list to try eventually.


I am so in love with the way this paint color turned out. It's not too dark and it changes from beige to gray and it's creamy and warm. Pretty much exactly what I wanted. The color is Loggia from Sherwin Williams color matched to Valspar paint.

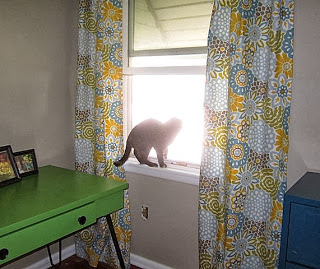
Our cat likes it too!
If I can leave you with one thought, don't be intimidated by the paint! The test pots from Lowe's are around $2. Yes, I know that can add up, but sometimes you get lucky and you end up liking the first or second one you tried. It's so much easier to test first, than being stuck with a $35 gallon of paint that you don't even want to look at.

How about you, do you have any tricks you use for picking paint colors? Did I leave anything out? Have you found colors you love and some not so much? Have you found that some colors look good in one room and not the next (like my door)? 

Jump in to the conversation and post your comments below! 


Tuesday, October 22, 2013

Silver Night Necklace


Normally I have some sort of inspiration or even a feeling of where a piece of jewelry I design has come from. Sometimes, it comes out of nowhere, just poof and and it all comes together. That's how it usually works for me when I make anything black, silver and grey. For me these colors are really easy to work with, I truly never get sick of using them. Maybe it's because they are a classic combination for nighttime jewelry, they just seem to sparkle more at night. I always seem to pull them out when the weather turns cooler.


I really like using this combinations of colors (yes I know black is not technically a color) with a faceted moonstone that catches the light and sparkles. This piece does not have any moonstone in it. I'm in the process of reorganizing my bead storage and could not find them. I am definitely going to design a couple of these necklaces, just need to order more chain. Some of the chain will be gold filled, gold plated, sterling and gunmetal. There will be a price point for every budget. I'm a big believer that everyone deserves to have nice jewelry that makes them smile and feel good when they wear it. I'll post the photos here when I make them!

* I got caught up on season 8 of Supernatural while working on this necklace.

Wednesday, October 16, 2013

How to Paint Laminate Furniture


Man, I love thrift store shopping! I needed some new to me picture frames for a project I had in the back of my mind, and both Hobby Lobby and Michael's were running 40% to 50% off of their frames. Holy cow, even though they were that much off they were still around $15. I was not about to spend that much, because I knew I was going to have to paint them and I wasn't going to use the glass.

So, off to the thrift shop I went. Well, I found my frames, and something else. Doesn't that always happen? I found a coffee table in very good condition and had very few scratches. The top was laminate and the legs were wood. I did not purchase it that day. I have a 24 hour rule, if I can't stop thinking about an item for 24 hours I'll go back and get it. If it's not there, then it wasn't meant to be.

Before shot

Well, I fell asleep thinking about all the different paint color combinations that would look good on it. I envisioned an industrial look with brackets and flat dark paint. The next day I had to go back and get it. I was lucky, it was still there and only $15! It was totally meant to be mine.


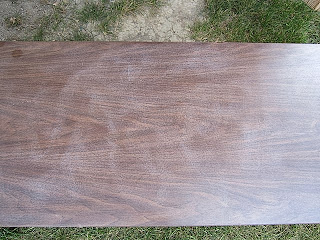
There was truly nothing wrong with it, just a few scratches. I knew I was going to paint it, so the scratches didn't matter, a little filler and paint and you'd never know they were there.
My cat thought it was for her.


I had intentions of painting it and selling it, but then I started thinking about making it a gift for my partner. We have a basement that he uses as his man cave. There different sports artifacts all over down there. He has a few friend that come over and they hang out in the basement, and watch whatever game is on at the time. There are a couple side tables, but no coffee table for people to put their drinks.

Here's another before shot

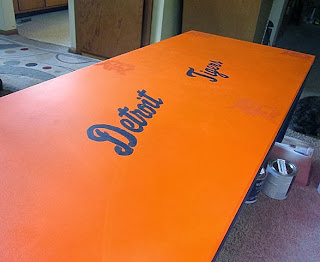
I was talking with my neighbor and she helped me come to the decision of making it for him. His teams are the Detroit Tigers and the Detroit Lions. It was between the two, orange/ navy or silver/ blue. Well, I was in a orange kind of mood so the Tigers won. Enough of my rambling, here is what you'll need.

Supplies:

TSP
Two buckets for TSP
Gloves
Sponges
Cloth diaper
Oil based spray primer
Flat Paint in your teams colors (I'll explain this farther down)
Sanding block
Palm sander
Tacky Cloth
Stencils for your team
Foam roller
Brushes
Dust Mask
Wood Filler

These first few steps are the same as this and this post. If you have already read those posts skip down to step 4.

Cleaning your furniture is a must. I know some people do not use TSP, they just wipe it down. The reason I use it is because it cleans really well and it removes some of the top layer of whatever is on it. That means less sanding.

1. This is where you'll need your two buckets, sponges and gloves. All I'm going to say is, wear the gloves! If you don't it will burn your fingers and ruin your manicure. Okay, fill one bucket with warm water and one with the TSP solution. Using your sponges, and working in small areas wipe on the TSP and follow with a wipe down of water.

I should mention I do this step outside. You can do it inside, just make sure you protect everything around your piece- you don't want to ruin anything.

2. After you get your whole piece wiped down and dry it's time to use the wood filler (if needed) and sand. I've read that some people do not sand laminate if they are using oil based primer. I still sand lightly- just enough to remove the shine for better adhesion of paint.


Alright, if you have dings or nicks you want to fill, now is the time to do it. After the wood filler is dry it's time to put your dust mask on and sand. I used a sanding sponge on the sides and legs and my electric palm sander on the top. The legs on my coffee table are wood and I just needed to sand lightly. I did not need to remove the stain.

3. After you sand, you need to remove the dust. I wipe it down with my cloth diaper and water, but you can use anything that is lint free. I also go one step further, when dry use my tacky cloth and wipe it down again. I know it's overkill, but I don't want to spent all the time prepping and painting for dust to be my undoing.

* please keep your dust mask on for this too!


4. Priming. If you've read my other posts, you know this is my favorite part. I really like oil based primer, but I don't like how I have to clean my brushes after. For this step I decided to use a spray primer, so you have to do it outside. There is no reason you can't use a water based primer and roll it on. If you are rolling it, you can do it inside.

Please read my tips on spray painting here.

For this coffee table, I only needed two coats of primer. I did sand (using the sanding sponge) the last coat a little, just to make it smooth. I then used the tacky cloth again to wipe it down before painting.

5. Painting. I did a quick search on the Tiger's colors and found Gliddon offers MLB, NFL, NHL, NASCAR and others at Home Depot. Well, I printed out what I needed and went to Lowe's and had them look up the colors and I used Valspar Paint + Primer. The names of the paints are Detroit Tigers Orange and Detroit Tigers Midnight Navy, which I got both in matte. I then got another orange in semi-gloss.


I had never worked with matte paint on furniture before and let me tell you I love it. I love the way it looks and the adhesion was amazing! I painted the top matte orange and the bottom half navy. Seriously, I love both of these two finishes so much I'm searching for something else to paint!

I did three light coats of paint. I painted two one day and then let dry overnight and did the third in the morning. You could totally be done with your piece with this step or you could take it to the next level and do what I did.


This is where I decided I absolutely need a Cricut. It would have been so much easier using one, but what I did was so much cheaper. It was free. Now, I need to plan some projects to see if the price of a Cricut is justifiable. Okay, back to the steps.


6. I Googled around looking for a stencil for the English D and of course I couldn't find one, but I did find a pumpkin stencil  So I decided to make my own. For the D I printed it out on paper and cut it out. Then I laid it out on top of cardboard and using a craft knife cut it out. Since I was only going to use the words (Detroit Tigers) once I just cut it out on paper.


7. This is where I had to adjust my technique. For the first D I outlined it in the semi- gloss orange and then filled it in. I was going for a subtle, I didn't want it to pop out and scream at you- hello, here I am. I totally nailed it, it looked gorgeous. Then I realized this coffee table was going in the basement where the lighting is bad, and the D wouldn't have been visible.

 So, I made a last minute trip to Michael's where I knew they were running a sale on their craft paint. I ended up choosing Martha Stewart Crafts paints in Geranium with a high gloss finish. That did the trick! I outlined the D's and filled it in with the Geranium first. Then I topped it with two coats of the semi- gloss orange.


This gave me the effect I was looking for. I was planning on covering the whole coffee table in the D's, but stopped myself at six of them.


8. Before painting Detroit Tigers on the table, I busted out my tape measure and made sure the words would be centered. Because even though I don't watch TV much down there, if the words were off center it would drive me crazy until the end of time!


For some reason painting the words on took longer than the D's. Maybe it was the paper I was outlining and not cardboard? With this, I only need to paint two coats of the navy.


After the last coat was dry I lightly sanded and stood back and smiled. I love everything about this how this coffee table turned out! I loved surprising my partner with it. He works out of town during the week and when he got home on Friday the coffee table was in the living room to greet him. I'm not sure who was more excited me or him.


Have you tried painting furniture? How'd it turn out? Do you have any projects like this you are wanting to try? Please post below.

Oh and seriously, if you have a Cricut, do you use it a lot on projects? Is it worth the price? I'm really trying to justify getting one. I know there is another machine like it, I just can't remember what it's called.
If you know what it's called, please post it below.


Monday, October 14, 2013

Fall Wreath


I am obsessed with wreaths. I love them for fall or Christmas. When I go to someone's house and they have one I always check it out. It fell in love with Christmas wreaths and it grew to include fall wreaths. It started where I use to work, they would decorate for the holidays with heavenly smelling pine wreaths and swags of pine garland. They would do this when we were not there and when we would show up for our next shift, we'd be greeted to a place that magically changed into a beautiful warm and cozy atmosphere. The smell was amazing, because they used real pine. Towards the end though we'd find pine needles everywhere!

I have a confession to make. As much as I love wreaths and love how they can transform a space, I've never had one and never made one. I know, how is that possible? I have actually gone so far as to asked for them as a Christmas present.

So, this year I've decided that this is the year of the wreath! Not only am I going to have one, we as a family are going to make it, well, at least design it as a family and I'll put it together. Now, we have a new family tradition, for fall and winter we will make wreaths together.

So, here is our fall wreath project designed by our daughter and I. This was super easy to do, and I didn't even have to use a hot glue gun! I didn't have to use a hot glue gun because I did not layer the flowers or berries. If I was going to sell this wreath I would definitely use one. I also plan on taking it apart and using it as a holiday wreath, (because I'm cheap) and I couldn't do that if it was all glued down

Supplies:
I got everything at Hobby Lobby. I was really lucky the day I went, everything I needed was half off! The prices below are the full price.

Grapevine $6.99
Miscellaneous Flowers ranging from $2.99 to $3.99
Berries $2.99
Dahlia $6.99
Wire cutters, I had theses on hand


I really wanted this to be a family project, so while our daughter was at school her dad and I went on a trip to Hobby Lobby. My budget for this was right around $20. I'm glad I took him with me because I got to see what he gravitated to for when we do the holiday wreath.


1. We started with the three big flowers. I wanted the three flowers to be laid out off center on the top left, that was my only request. Then our daughter took over.

 It was the end of the week, excuse the mess!


 2. With a starting point it was really easy for her to lay out her design. I swear she was done in like 5 minutes and it looked really good.

3. So, once she had everything laid out, I got to work. I used my wire cutters to snip off some of the stems I didn't want. The berries were easy, I just unraveled them from the wire stem.


4. Since I wasn't planning on using a glue gun, I need to make sure the stem had a little length so I could fish it through the grapevine.


5. I did this with all of the branches. It really couldn't have been easier! We didn't fill in gaps because all three of us really liked the way the grapevine looked, so we wanted to make sure you could see it. I could have taken all of the branches apart to have more, but I didn't really need to do that.

6. Here is the finished wreath. Yes, it's on my table and no, it still isn't hung. We couldn't quite agree on where we wanted it. I wanted it on the door, he wanted it on a wall so you could see it when you walk in our house. Now, I think it's going above the TV. Or...maybe we should make two more?


I'm not sure why wreaths intimidated me before, this was super easy and fast! Now, I'm thinking in layers for the next one...


How about you, have you made your own fall wreath this year? I'd love to hear from you! Also, if you have a photo, please share it with us.

Friday, October 11, 2013

Cereal Box Makeover


Alright, I'm going to just come out and say this, I have way too many magazines. I have ones I recycle and ones I keep. Anything that has to do with food, yoga, beads or diy are keepers and the rest are recycled. In an earlier post I said how I was late to the joys of scrapbook paper and now I'm playing catch up.This is a very easy and cheap way to hide the magazines you keep.


This cabinet is a work in progress for me. I shove cookbooks, photos and magazines in it and it usually looks like an unorganized mess. Especially since it's rocking so many different colors. So, no matter how much I reorganize it, it will always look messy until I can unify the color scheme. I've decided to start with the magazines- then I'll move on to the books. Maybe make some book covers?

Supplies:
Cereal Boxes
Scrapbook Paper- 2 for each box
Mod Podge
Foam Brush

I purchased everything I needed from Michael's and the cereal boxes came from my neighbor and sister. I used the one pound boxes. This was a very fast project, it took me longer to pick out the paper I wanted to use than actually putting it together. I wanted a color combination that would be soothing and not jump out at me. Basically I wanted the colors to blend in and recede into the background. Although, yellow is not one you would normally think of doing that, this yellow is really muted. All three colors together seemed to give me the effect I was looking for.
My lovely paper


1. I measured where I wanted to cut. From the bottom I  measured 5 inches up and the side 3 1/2. I wanted to make sure the magazine wouldn't flop out.


2.I saved the part that I cut out and used it as a template for the rest of the boxes and it save a lot of time because I didn't need to measure the rest of the boxes. I just traced around it and cut.

3. I then took my paper and laid it out to see how it wanted to hide the seam. The best way to do that was to hide it on the side of the box on the opposite side of the cut.


4. I then took my mod podge and started slathering it on the box. I laid the first piece of scrapbook paper on top of it and smoothed it out the best I could. With the first one I didn't do a very good job of it, but by the third one I had gotten the hang of it. Then I just repeated it on the other side.


5. After I had both sides done I just stared cutting the excess away. I left about a 1 1/2 inches so I could fold the paper over the sides and I used the Mod Podge to glue it down. On the bottom I just folded the paper like a present.


On the sides and top I had to cut a few slits so it folded nicely.

You can totally see the bubbles here.

6. When everything was in its place I brushed on a layer of Mod Podge over the surface of the paper to protect it.


I really like the way these turned out and I think it's a great way to upcycle something that was destined for the recycle bin.


This is where my new magazine holders found there home. Like I said before this cabinet still needs a lot of work, but it's one step closer to being organized now. I'll probably get it just how I want it and then need to take everything out so I can stain it, because that is on my list too.

Have any of you done this same project? Have you tried it with fabric? Please post a picture if you do this project, I'd love to see it.