Monday, September 30, 2013

How to Paint Wood Trim (Part two)


Well, I spent the weekend ripping up carpet in my hallway. I got really lucky, there was no adhesive used, just staples! A lot of them, but I'll take it! I really didn't want to bust out chemicals to remove adhesive from the carpet padding.


That's me removing a tack strip, the hard way. We have big plans for this hallway.Something like this

Holy cow, what was I thinking?! It makes me laugh everytime.

I also, painted my front door- twice this weekend. Not twice as in it needed two coats, but twice as in the first color clashed horribly with the wall color. I used this color on my bead cabinet and it looks great, here not so much. A warm yellow next to a cool yellow doesn't work. It's now white, and I'm still thinking about the next color it will be. 

Okay, enough about my weekend, here's the second part to the How to Paint Wood Trim. If you missed the first part, you can check it out here.


I truly had a hard time finally deciding to paint the wood. There was absolutely nothing wrong with it, besides all of it needed re-stained  On one hand, I love the look of wood trim, on the other we would love to eventually sell our house. After finishing this project in the one room, I found I loved the way the white trim looked so crisp and fresh. Well, I better because there was no turning back. I also discovered how it made the mint paint on the walls appeared so much darker, but I'll save that for another post.

Yeah, doorways bite to paint. Just saying!

This was a huge undertaking for me. I had never done anything like this before and knew how much work was ahead of me. All of the trim in the whole house looks like this and I knew if I took on this project I'd have to paint all of it!

Supplies: I got everything from Lowe's
Tape
Primer of your choice (I used two different kinds oil based and water based)
Sanding sponge or paper
Paint (I used Valspar Shooting Star)

After all the trim was washed, filled, sanded and caulked it was time to prime. I ended up using two different primers, because I ran out of the first one. The first one I used was oil based and my favorite. I feel like it covered way better, and you can use a lot less! I only needed one coat of the oil based as opposed to the three in some spots for the water based. I had way more more of the wood stain showing through with the water based. That didn't happen at all with the oil based. However, cleanup's a breeze with the water based and it's way more environmentally friendly.  


*FYI- this is what the caulk looks like when it's dry and ready to paint. Goes on white, dries clear.


1. Tape off everything you don't want painted. I know a lot of people who have a steady hand and don't do this step. Me- I'm messy!

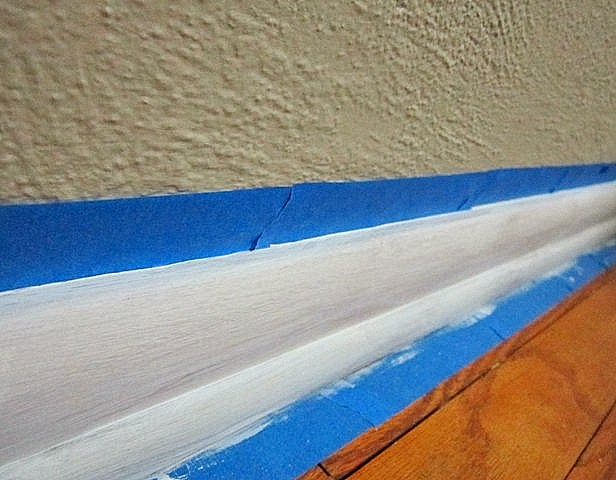
2. Prime, use thin coat. Priming helps to block stain and helps the paint to adhere to the wood.The trim around the floor only needed two coats. The trim around the window and doorways needed three. On both my primers, it said I could top coat it in an hour.


This is one of the reasons for priming, and the reason I like oil based primer. This was the first coat of primer and the stain was showing through it. That's why it took three coats of primer on some spots.

3. Sanding. I only sanded once between coats to keep the trim smooth. If you have any drips, don't be afraid to sand them down. If you skip this step and the primer has lumps and bumps you'll see it under the paint. Oh, and the oil based sands so much better than the water based.

Do these first to steps as many times as you need before you paint.

4. Paint. Since I was using a very white paint for the trim, I made sure I used a paint with primer. This may be overkill, but it worked out well. I also used a high gloss paint because I like the way it looks on trim and you can spot clean it. All the trim needed three coats.

5. Sand, again. This is were I messed up. I didn't do it and I found a few drips. Luckily they aren't in really noticeable places, which would drive me flipping crazy if they were. Just make sure you wait until the paint is dry.

Again, do these last two steps as many times as you want. 

I used three coats of paint. The paint needs to be really dry. I usually let the coats dry over night. If you don't, you'll have a gloppy mess and it will undo all of your hard work. Painting and priming really don't take as many steps as the prepping steps. 


I really love the way the white trim looks, nice and crisp. The white is more of a cool white. You could definitely pick up a warmer white. I actually matched it to the white in the windows. I'm glad I did, I feel like it opens the whole room up too.

*If you read the first part to this post you know I screwed up on the caulking and did it last. So, after I caulked I had to paint another coat on top of the caulk. Fun.

Have any of you taken on a project like this? I'd love to hear about it. I'd also, love to hear about any tips or tricks you might know.


Friday, September 20, 2013

How to Paint Wood Trim (Part One)


When it comes to painting furniture or trim prep work is key. Some of it sucks to do, but looks amazing in the end. Actually, painting doesn't take nearly as long. The reason for this post is I'm gearing up for what I think is a pretty big project and have a couple of days worth of prep work ahead of me. The project consists of 6 door and all of the trim in my hallway, which is all wood and its never been painted. 

So, instead of one giant post I'm going to split it into a couple of them. It won't be the most exciting of posts, but it's essential for a long lasting professional look. I really want you to know that this is my opinion and the products I name are the ones that I've used. There might be better product, I just have not used them.

I'll do this in steps in order of the way I do them, just to make it a little easier. So, here is what you'll need if you are prepping wood for painting. I am not including primer in here, because to me priming and painting go together.

Lint Free Cloth or Cloth Diaper
2- Buckets
2- Sponges
TSP- Trisodium Phosphate
Gloves
Wood Filler
Dust Mask
Sanding Sponge
Electric Hand Sander (for larger areas)
Vacuum cleaner or Wet/ dry Vac
Tacky Cloth
Caulk  

1. Wipe the wood down with a wet cloth. This is an optional step, but I've started doing this because the TSP water gets dirty fast and I find myself changing the water constantly.


2. Mix your TSP according to directions in one of your buckets. The other fill with water. Put one sponge in each of the buckets. Wear gloves when using TSP, it is a chemical and it will burn your fingers. This stuff is awesome, it helps remove the shine from the wood, so you don't have to sand as much and the paint will adhere to the paint better. Working in small areas, wring out your sponge, just so it's damp- not dripping and wipe it over the surface. Then grab your water sponge and go over the same area in the same motion as the TSP. So, you're putting it on and wiping it off. Change both the water and TSP water frequently, you don't want to be cleaning with dirty water.


3. Wood filler is next. You're going to want to check for holes, dings and nicks and fill them. Don't skip this step, if you don't fill them you will be able to see the indentations under the paint. 


The wood filler is really easy to use, you can squeeze it into the hole, or put it on your finger and smooth it over the nicks. Then take anything with a straight edge and wipe off the excess. Don't worry if you miss a little of it, in the next step you will be sanding so that will remove it. Go ahead and let it dry to what the back of the package says.


4. Sanding. You are going to want to wear a dust mask for this step. This is where you are going to remove the rest of the sheen. You are not removing the stain, you're just sanding enough to make the surface look flat. This is also a time you can sand down small scratches. Basically the ones that were too small to fill. This is also where you sand down the wood filler and make it flat. It's a good idea to work on a small area at a time. That way you can run your hand over the area to make sure it's smooth. Remember, you want a smooth, matte surface before you prime.  
5. Clean up. Sanding is a dirty, dusty job and it will be everywhere. It's best to clean it up as soon as your done. Take your vacuum and try to get as much of the dust up from the wood as you can, especially in the crevices. After that's done wipe it down with a clean, lint free, damp cloth or diaper. I then use the tacky cloth and wipe it all down again. All this wiping down might be overkill, but I just want it as clean as possible so the paint will adhere.  


6. Caulking, I'm just going to put this out there, I really don't like to caulk. It sucks and makes my fingers and back hurt, always. It's not hard, just time consuming and it takes me awhile to recover from it. No matter how much I don't like it, I would never skip this step, just because it makes the trim look brand new and polished. I get the kind of caulk you can paint, the other kind you apply after you paint and it can look obvious. The paintable kind blends in and gives it a seamless look, because you paint right over it. The picture shows me caulking after I had finished my last coat of paint only because I didn't know any better. I did paint over it again. Thank goodness a friend of mine who is a professional painter told me about it! If you use the other kind after you paint it can yellow and I definitely didn't want that next to my snow white trim!


The way I caulk is, I cut the tiniest hole in the tip that I possibly can and will still let the product flow. You really don't need much, just pipe it on taking care to work in small sections. 

You then take your finger and run it down over the caulk you just piped. Now you know why my finger hurts. They make tools for this step, but my finger worked way better. I just keep a paper towel with me so I can wipe the excess off my finger.


This sounds like a lot of steps, and for me it is. It takes me twice as long as it would someone else to get this done, even in a small room. After you get through all of these steps the only thing left to do it prime and paint!

I know this post really isn't the most exciting, but these steps are crucial for making my trim look as professional as possible. 

If I'm missing anything, please let me know in the comment section. I'd love to hear from anyone else who has taken on a project like this. Did you find it overwhelming?


Thursday, September 19, 2013

J is for Juliet


    Ahh...I couldn't resist, In a previous post I talked about my new niece on the way and how I could see another letter project in the future. Well, she's here and just as sweet as only a newborn can be. She's a little over a week old and my daughter and I just can't get enough cuddle time with her. I wish I could post a picture of her, you'd just want to eat her up. 

Okay, enough about my niece and how good she smells and how unbelievably cute she is. I am just loving letter trend right now. There are just so many ways to display them and it's a super affordable project to give as a gift or match to your own decor. Plus it gave me an excuse to hit up Michael's.
Oh my goodness, don't you just love this paper?

Supplies from Michael's
Letter J 4"x 6" (I splurged for the more expensive one this time) $2.99
Paint: Martha Stewart Crafts, Pearl Fruit Punch  $2.49
Foam Brush 2 @ $.05
Scrapbook paper 3 @ $.16!

Thrift Store Find
Oval Frame $2.00

Lowe's
I had all of this on hand from other projects- so I'm unsure of the price
Odorless oil Based Spray Primer
320 grit sandpaper
White Lacquer High Gloss Spray Paint
Spray Adhesive
Liquid Nails
Mod Podge

As always I'll put this into steps.


1. I started with the frame, and took everything out of it and spray primed the letter and the frame. The J only needed one coat of the primer, but the frames were yellow and needed a few coats. I knew I was going to paint the frames white so I really wanted no trace of the yellow peaking through.


2. I let the primer dry for an hour.I then gave it three thin coats of the white spray paint. Look below for a few tips on spray painting. I've probably missed some, but here is what I've learned so far.


Tips for Spray Painting
  • When you're spray painting it's best to keep the can moving and use very thin coats to avoid drips plus doing this makes the paint appear more uniform. 
  • Wear a mask- Spray paint is nasty stuff, you don't want to breath that in.
  • Spray paint outside- You'll be surprised how messy spraying is. I'm getting better at it, but the first time I painted 8 frames at a time, I had white paint all over my ankles and feet! Let's just say I'm so impressed with spray paint artists and how talented they are! I seriously have no idea how they do it.
3. I let the frames and the J dry over night.


4. After I dropped my daughter off at school I got to paint the J. I was a little excited about this, because the Fruit Punch color is so cool. It's a super vibrant pink that gives off a happy vibe. In large quantities it could be overwhelming, but it was a perfect amount for the size of the J. I used the foam brush to paint on three coats of this lovely goodness. Seriously, I just love this color. It makes me smile just to look at it while I'm typing.


5. While the paint was drying I laid out the paper in different combinations until I found one I liked. When I did, I went ahead and cut the papers to fit the cardboard from the back of the frame. I laid the paper on the back and used my craft knife to cut each one out.

*Ahh...this is where I kind of screwed up and should have used a tape measure and a straight edge instead of eyeballing the paper. So instead of doing what I knew I should have, I just laid out the paper and thought it was right. Well...It wasn't, the third layer was super uneven and I had to cut off  more paper than I wanted to make it straight. Then, that screwed up my polka dot layer, making it thicker than I wanted it to be.

6. For the yellow layer that filled the whole space, I took it outside and sprayed cardboard with the spray adhesive and laid the paper on it. A bonus to the adhesive is that you have a little bit of time to move the paper around before it dries, so you're not screwed if you didn't get it right the first time.


7. When it was dry, I covered the yellow paper in Mod Podge with the foam brush and then laid the polka dot layer on top of it. I then added another layer of Mod Podge on top of it. I did the same thing with the last layer.

I was doing great until I saw bubbles forming in the paper. Seriously, what the crap?! I thought I smoothed everything down, but I guess not good enough. I should add that most of the bubbles came out, when it dried, but not all of them.


8. I let the papers dry and turn clear, then it was time to attach the J to the paper. I used the liquid nails to attach it, and just slathered it on the back of the J and positioned it onto the paper. I put a book on top of it for some pressure and left it alone for a few hours.

*Side note- that may or may not be way too much liquid nails. I'm actually not sure, because it seemed okay when it dried.

9. When I did this project before I let the liquid nails dry for two days before I hung it up.This time after a few hours I put it back in the frame. I got a little excited because I wanted to give it to my sister and we were heading that way. Any other time I would have let it sit for two days.


So, here you go! It really is a fast and easy project. I just love these letter projects, and have a few more in mind for later. I think this will look at home in my niece's room

Have you done any projects like this? Or have any in the works?  I'd love to hear about it!

Oh, and if anyone can help me out with the bubbling issue I'd be really grateful.

Monday, September 16, 2013

Stitching and Zombies

No, this post isn't actually about zombies, so if that's what you're looking for, turn back now. I am just going to go a head and put this out here, I'm a little obsessed with the color blue right now. Especially teal. For me, I'm more attracted to certain colors with the weather and my moods. Not the, it's rainy and cold, and I'm feeling blue, moods. More like in the spring I'm all about coral colors, but that could change at any moment. 

Right now, we are moving into fall and I keep seeing the beautiful burn oranges and red. Don't get me wrong, I love those colors too, but I'm just not ready to let go of summer yet. So, I'm going to hold onto summer for a few weeks longer. 


This photo was taken during our Disney trip this year. I was hanging out with the girls and was leaning against this teal pillar, when I realized the teal, lavender and white made a somewhat stunning color combination. 

I went ahead and snapped a photo because I knew with my memory issues I would not remember later. Of course I forgot all about it, and it wasn't until my partner was showing his family the photos at the lake that we ran across it again. He was like, What is that, why did you take that picture? 


Well, he didn't understand, but I did. So, as soon as I could, I went to work. I just love the way the white pops with the teal, and how the lavender makes the white faceted beads almost seem translucent. The teals are not exactly the same, the teal in the bracelet has a little touch of grey. I also pictured the bracelet a little different in my head, but I still really like the way it turned out.

A little side note, I almost always watch a TV series when I'm making stitched pieces. This was no exception, I came late to the series The Walking Dead but caught up quickly with marathon sessions of stitching and zombies.


Wednesday, September 11, 2013

How Not Screw Up a Painted Table


Okay, so let me start this post out by saying I had never painted furniture before painting this desk. At least I think it's a desk, or maybe a side table? If someone knows, please let me know, for now I'm calling it a desk. So, anyways painting furniture kind of scared me. I stared at the desk for a couple of months wanting to pain it but not sure. I was just really freaked out I was going to screw it up somehow. I have this weird issue that when I do something like this it has to be perfect, even though I'd never done anything like it before. 

I realized the desk had some issues already and the only way to fix it would be to paint it. I knew no matter what I did to it, it would look better than it did at that point. 

Sorry about the bad photo of the before desk, but I didn't realize I was going to blog about it. 


There are so many things wrong with this photo, but I'm just focusing on the desk! I had found it in our basement about 2 years after we moved into our home and brought it upstairs. The top of it was pretty much ruined from years of use. I thought it would be a good place for our daughter to do homework- she didn't by the way. It pretty much just got covered up with beads and unfinished projects! I figured if I added a couple of coats of a fresh colored paint I'd want to make sure it's nice and picked up all of the time.

Alright, here is what I used and how I updated the desk. I found everything I needed at Lowe's. You can certainly purchase these items at your favorite store, except for the name brand paint. I just went to Lowe's because it's super close.  

1. TSP Heavy Duty Cleaner
2. Rubber Gloves
3. Cleaning Sponges
4. 3M Fine Sanding Sponge
5. Kilz Odorless- Oil Based Primer
6. Valspar Signature, Semi-Gloss- Grass Stain & Monteray Bay Teal
7. Goof off- Not pictured
8. Rust-Oleum- Oil Rubbed Bronze


I will break this down into steps, just to make it a little easier to read. First off I wanted to make sure the desk was nice and clean and the TSP cleans and helps to remove some of the shine so the paint will adhere better.

1. I mixed up the TSP according to the directions in the yellow bucket, on the left. The         blue held water and you absolutely need to wear gloves, the TSP will burn your               beautifully manicured hands. 


 In this photo above my daughter had just finished wiping the desk down.

2. She used 2 sponges, one for the TSP and one for the water. Working in small sections       she wiped down the desk with the TSP and followed with a wipe down of water to             remove the TSP. Easy!

Okay, I have heard that you don't need to sand before using a oil based primer, but I didn't trust that so I went ahead and sanded.

3. I did hand sand it. I only need to hit the sides because the TSP worked really well. 
    I really just need to rough the surface up a little. This was an old piece of furniture 
    and it really didn't have any shine left to it.


Moving on to priming, which for some reason I love to use. I think it has to do with once whatever you're working on is painted white, it makes it look like a wide open canvas, just waiting for you to make it beautiful.

4. Even though I love this step, I was in the process of teaching my daughter how to paint     so I let her do it. She used a brush in the tight spots and a roller on the top. She did 
    give it 2 coats, which might be overkill, but whatever. I went ahead and sanded 
    between coats to make it nice and smooth, and get rid of a few drips. 


5. After I let the primer dry over night I went ahead and gave the desk it's first coat of 
    amazing Grass Stain color. I have seriously always wanted to paint something this           color and was so excited to use it! I used the same method to paint that my daughter       used to prime, brushed everything, but used a foam roller on the top. This photo was       taken after the first coat.


This one was taken after the second, which leads to the drawer...


I'm going to leave out the steps, because the drawer follows the same ones as the desk, except for the knobs.
This is why you always buy a test pot of paint before purchasing a gallon! When I put this paint on I loved it, but when it started to dry it became this super bright screaming blue. Seriously, if I would have held in up in my window, my neighbor across the street would have told me it was too bright! I still love it for an accent color, but I was planning on using it on a dresser. 

NO, FLIPPING WAY!

So, I brought it back to Lowe's and asked if they could darken if for me. At first they looked at me like I was a crazy person and I could tell they didn't want to do it, but the crazy person I am persisted. 


They ended up adding 1 ounce of black and it calmed the color down. I think half an ounce would have been better, but I loved it! Come to find out later what I should have done (and no one bothered to tell me) since the color was so dark, I should have used a tinted primer and the color would have been more true. Oh well, I'll do that next time!

6. Alright back to the steps. I could not afford new drawer knobs, so I spray painted             them instead, and I'm so glad I did. I think they turned out awesome!  The spray paint 
    I used had primer in it so I just needed to give them a few coats and they looked like 
    new. 
7. Step back and enjoy! When I finished this project, I just stared at the desk and smiled 
    like an idiot, and I may or may not have danced around the room. 

This project was my first painting project and I'm pretty sure it broke my fear messing things up, well not broke, but definitely softened it a little. I've been coming up with new projects constantly!  

Your turn, do you remember your first project? Were you scared or exhilarated, somewhere in between?

If you follow these steps and paint your own furniture, please post a photo or a link in the comments section. I would love to see them!    

Tuesday, September 10, 2013

It Started with a Plant


I love making jewelry and have been doing it for 11 years. My style has evolved with time and changes with my moods. I really truly enjoy exploring unique color combinations. I take my inspiration from everything I see, from nature, scrapbook paper, lining up nail polish bottles (which I'm obsessed with and might have a problem with) to checking out Pinterest. 

So, from time to time I'm going to show you where I get my inspiration for specific pieces of jewelry. Eventually, I'll leave the link for my soon-to-open Etsy shop, and if you're interested you can purchase the jewelry there.

For this bracelet I pretty much had two inspirations for it. Mainly one inspired the other which paved the way for the third, the bracelet. 


The first one was at the beginning of the summer I became obsessed with a lime and purple color combination for my annual pots. In this pot there are three plants, two Coleus and a Petunia. I did not save the Petunia tag, so I'm not sure what it's called, but Fishnet Stockings and Gays Delight are the Coleus. In the photo you can barely see the Fishnet Stockings, it's in the top right corner. If you're close to Fort Wayne, you can pick up all three plants from Stuckey's Greenhouse on Tyler.


This is the second one that helped play a part in the creation of the bracelet. I had just discovered the joy of scrapbook paper (I know, I'm super late to the party) and wanted to do something with the Pretty as a Peacock paper I had picked up at Michael's for 50% off. I decided to dust off my dormant craft skills and bust out the Mod Podge for a super fast and simple canvas wall art project for my daughter's bedroom, and purple is her favorite color right now. 

Both of these, the plants and the peacock with their gorgeous color combinations stuck in my head and I couldn't stop thinking about them. That's when my peacock bracelet was born. From the teal and lavender seed beads, and lime green drops to the iridescent tile like beads, and crystals which flash different colors in the light, I feel it's a good representation of a peacock's feathers.

Here is the bracelet again, can you see the idea behind it? 


The TV show I was watching while making this bracelet was Lost Girl.

How about you, is there any place you like to take your inspiration from? Is there a certain color combination you just can't get out of your head? Let me know in the comments section.