

Ahh...I couldn't resist, In a previous post I talked about my new niece on the way and how I could see another letter project in the future. Well, she's here and just as sweet as only a newborn can be. She's a little over a week old and my daughter and I just can't get enough cuddle time with her. I wish I could post a picture of her, you'd just want to eat her up.
Okay, enough about my niece and how good she smells and how unbelievably cute she is. I am just loving letter trend right now. There are just so many ways to display them and it's a super affordable project to give as a gift or match to your own decor. Plus it gave me an excuse to hit up Michael's.
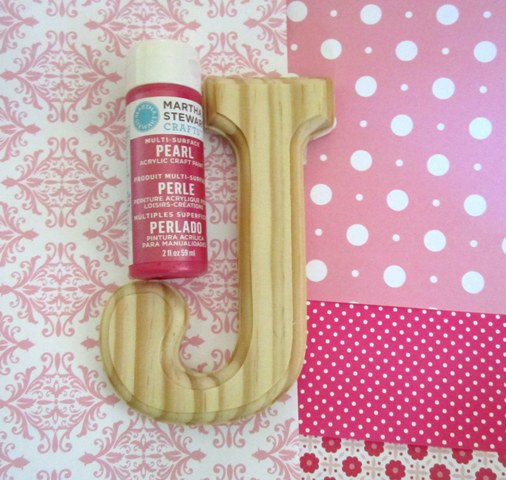
Oh my goodness, don't you just love this paper?
Supplies from Michael's
Letter J 4"x 6" (I splurged for the more expensive one this time) $2.99
Paint: Martha Stewart Crafts, Pearl Fruit Punch $2.49
Foam Brush 2 @ $.05
Scrapbook paper 3 @ $.16!
Thrift Store Find
Oval Frame $2.00
Lowe's
I had all of this on hand from other projects- so I'm unsure of the price
Odorless oil Based Spray Primer
320 grit sandpaper
White Lacquer High Gloss Spray Paint
Spray Adhesive
Liquid Nails
Mod Podge
As always I'll put this into steps.

1. I started with the frame, and took everything out of it and spray primed the letter and the frame. The J only needed one coat of the primer, but the frames were yellow and needed a few coats. I knew I was going to paint the frames white so I really wanted no trace of the yellow peaking through.

2. I let the primer dry for an hour.I then gave it three thin coats of the white spray paint. Look below for a few tips on spray painting. I've probably missed some, but here is what I've learned so far.
Tips for Spray Painting
- When you're spray painting it's best to keep the can moving and use very thin coats to avoid drips plus doing this makes the paint appear more uniform.
- Wear a mask- Spray paint is nasty stuff, you don't want to breath that in.
- Spray paint outside- You'll be surprised how messy spraying is. I'm getting better at it, but the first time I painted 8 frames at a time, I had white paint all over my ankles and feet! Let's just say I'm so impressed with spray paint artists and how talented they are! I seriously have no idea how they do it.

4. After I dropped my daughter off at school I got to paint the J. I was a little excited about this, because the Fruit Punch color is so cool. It's a super vibrant pink that gives off a happy vibe. In large quantities it could be overwhelming, but it was a perfect amount for the size of the J. I used the foam brush to paint on three coats of this lovely goodness. Seriously, I just love this color. It makes me smile just to look at it while I'm typing.

5. While the paint was drying I laid out the paper in different combinations until I found one I liked. When I did, I went ahead and cut the papers to fit the cardboard from the back of the frame. I laid the paper on the back and used my craft knife to cut each one out.
*Ahh...this is where I kind of screwed up and should have used a tape measure and a straight edge instead of eyeballing the paper. So instead of doing what I knew I should have, I just laid out the paper and thought it was right. Well...It wasn't, the third layer was super uneven and I had to cut off more paper than I wanted to make it straight. Then, that screwed up my polka dot layer, making it thicker than I wanted it to be.
6. For the yellow layer that filled the whole space, I took it outside and sprayed cardboard with the spray adhesive and laid the paper on it. A bonus to the adhesive is that you have a little bit of time to move the paper around before it dries, so you're not screwed if you didn't get it right the first time.

7. When it was dry, I covered the yellow paper in Mod Podge with the foam brush and then laid the polka dot layer on top of it. I then added another layer of Mod Podge on top of it. I did the same thing with the last layer.
I was doing great until I saw bubbles forming in the paper. Seriously, what the crap?! I thought I smoothed everything down, but I guess not good enough. I should add that most of the bubbles came out, when it dried, but not all of them.

8. I let the papers dry and turn clear, then it was time to attach the J to the paper. I used the liquid nails to attach it, and just slathered it on the back of the J and positioned it onto the paper. I put a book on top of it for some pressure and left it alone for a few hours.
*Side note- that may or may not be way too much liquid nails. I'm actually not sure, because it seemed okay when it dried.
9. When I did this project before I let the liquid nails dry for two days before I hung it up.This time after a few hours I put it back in the frame. I got a little excited because I wanted to give it to my sister and we were heading that way. Any other time I would have let it sit for two days.

So, here you go! It really is a fast and easy project. I just love these letter projects, and have a few more in mind for later. I think this will look at home in my niece's room
Have you done any projects like this? Or have any in the works? I'd love to hear about it!
Oh, and if anyone can help me out with the bubbling issue I'd be really grateful.
No comments:
Post a Comment